
Your first week in Z Route: Redemption decides how fast the account grows later. Early mistakes are expensive: dead troops do not come back, stamina does not refund after a loss, and Omni Hero Shards spent on the wrong hero cannot be taken back. This guide covers seven habits that keep week-one progress intact — how to pick zombie fights, gather before every logout, recruit early, hold Omni shards, focus troop camps, set up a same-server farm account when the rules allow it, and clear every beginner event while it is available.
Watch the video: Z Route Week 1: 7 Mistakes I Made So You Don’t Have To
Video: Z Route Week 1: 7 Mistakes I Made So You Don’t Have To, by Devil King (server 184)
Important: This is an independent fan guide, not an official game notice. Example numbers below (recommended power, troop losses, camp levels, Road to Survival chests) come from verified in-game screens and can differ on your server. Check the live panels and the game rules before you spend resources or open a second account.
If you are brand new, pair this with the First 24 Hours Guide and the Daily Checklist. Use the Building Upgrade Calculator and Hero Calculator when a tip sends you into upgrades or hero investment.
Why the first week matters
The opening days set your pace. Accounts that overreach on zombies lose troops they need for City Conquest and Alliance Ambush. Accounts that log off with idle squads miss free gathering. Accounts that spend Omni shards early lock themselves out of the Tactical heroes they meant to build. None of that requires spending money — it only requires not throwing away the free progress the game already hands you.
Treat the list below as standing rules, not a one-day checklist. Work through each tip once, then keep the habits going: check recommended power before every march, send gatherers before every logout, recruit instead of hoarding tickets for a vague future event, and finish every beginner event while it is still available. When two tasks compete for the same resources, prefer the one that unlocks lasting power — Base milestones, the lead troop camp, gathering research, and event score chests — over cosmetic or soft-cap upgrades you can finish later.
The 7 first-week tips at a glance
| # | Tip | Cost of getting it wrong | Quick fix |
|---|---|---|---|
| 1 | Don’t overreach on zombies | Dead troops + lost stamina | Only march when your power is close to the recommended number |
| 2 | Gather every time you log off | Idle squads, weak base production | Highest node + gathering research; resource buildings stop around Lv.20 |
| 3 | Recruit heroes and survivors early | Weaker roster than peers | Recruit as many as you can; survivors cut build and research time |
| 4 | Hold Omni Hero Shards | Shards spent on the wrong orange hero | Save them for the right Tactical hero |
| 5 | Don’t level troop camps equally | Slow path to T7 | One camp leads (e.g. 11 vs 4); Base to 20; then match |
| 6 | Make a farm account | One account carrying all gathering | User Center → Switch Account → new email, same server (check rules) |
| 7 | Do every beginner event | Missed free rewards and Nora | Clear Power Awakening through City Conquest while they run |
Tip 1: Don’t overreach on zombies
Early stamina is already tight. If you lose the fight, you do not get that stamina back — so a bad march is a double loss: stamina and troops. A single failed attack on a level 15 zombie can leave 90 troops dead and 46 in the hospital. Hospital troops can be healed. Dead troops cannot.
Zombie types
| Type | What you get | When to hit it |
|---|---|---|
| Plain zombies | One resource only — metal, food, or oil | When recommended power is close to yours |
| Zombie horde | Mixed rewards, including speedups and blue gear chests | Same rule: only when you can win |
Hordes are worth killing when the power check passes. They are not worth feeding troops when it fails. If the march screen already shows low win chance, back out, retarget a lower zombie, or spend the stamina later when your power has caught up.
How to check before you march
- Tap the zombie on the map.
- Tap March.
- Read the recommended power.
- Compare it to your march power. For example, a level 13 oil zombie recommends 600,000 power; at 538,000 the game warns of low win chance and heavy soldier losses.
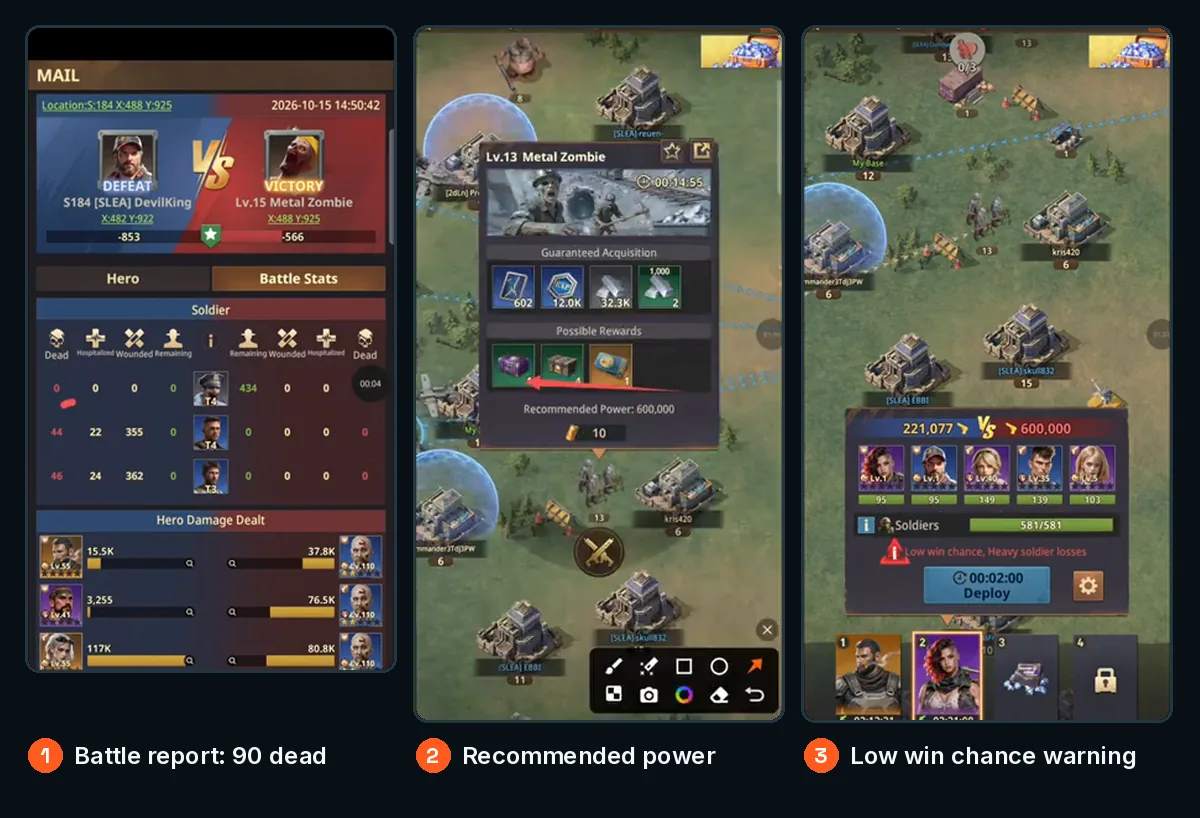
What a loss costs
| Example from a failed fight | Value |
|---|---|
| Level 13 oil zombie, recommended power | 600,000 |
| March power that still looked risky | 538,000 |
| Level 15 fight result | Loss |
| Troops dead | 90 |
| Troops in hospital | 46 |
| Stamina refunded after a loss | None |
Rule: attack only when your power is close to the recommended number. Otherwise skip the target and gather, recruit, or push a beginner event instead.
Tip 2: Gather every time you log off
When you go offline with squads sitting in base, that is wasted productivity. Send them to the world map first so they collect while you sleep, work, or queue.
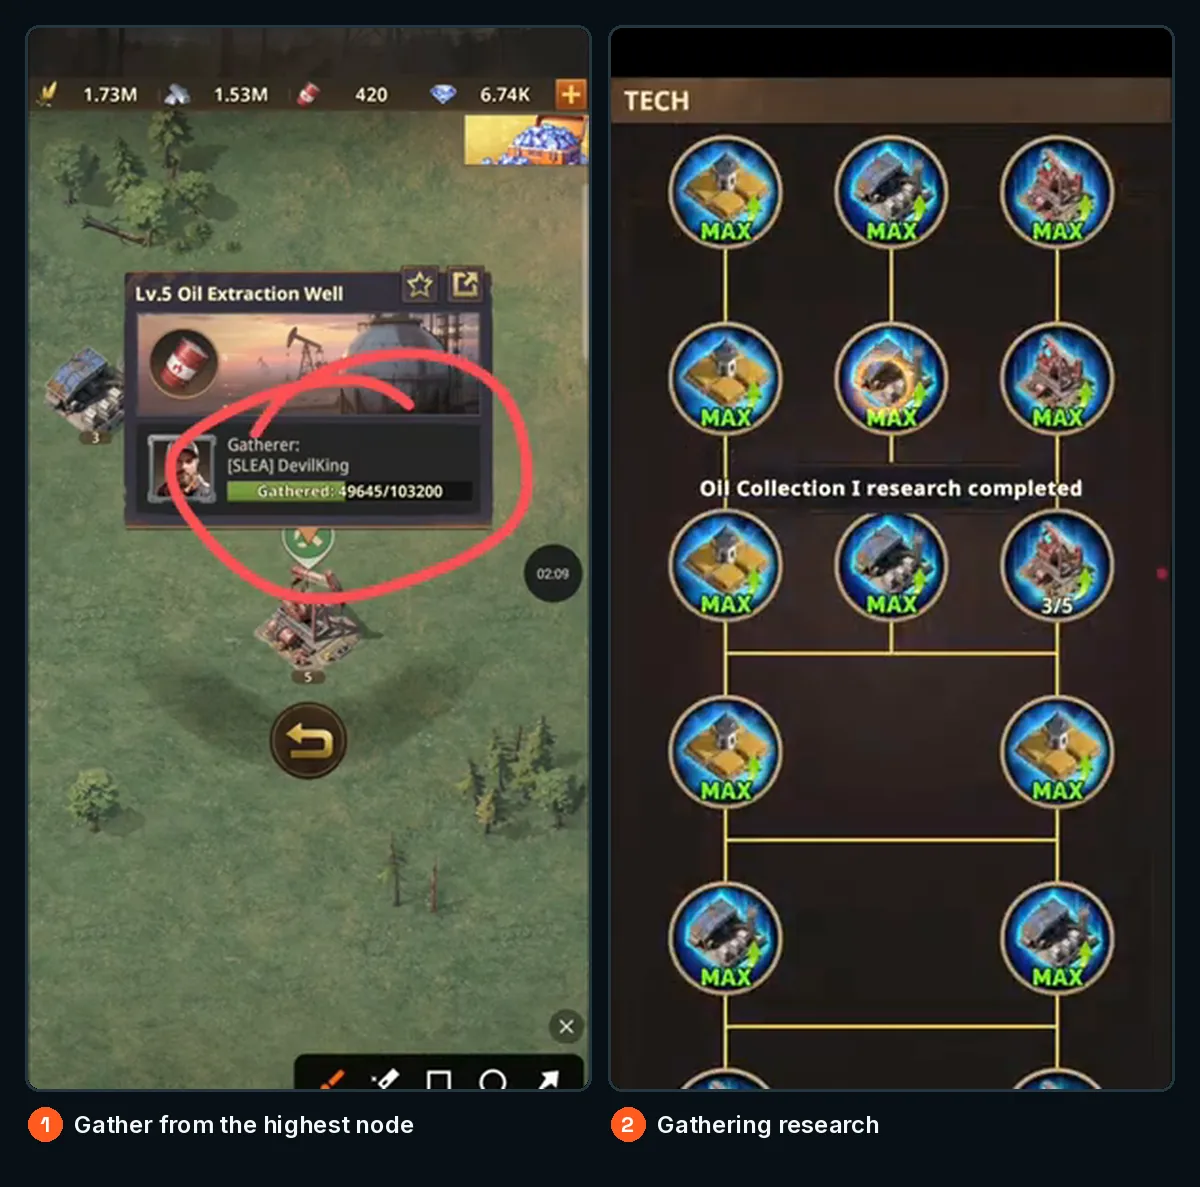
Offline gathering checklist
| Step | Do this | Why |
|---|---|---|
| 1 | Open the world map before logout | Idle in-base squads gather nothing |
| 2 | Pick the highest-level resource node you can | Higher nodes gather more |
| 3 | Keep gathering research progressing | Faster gather + better loads |
| 4 | Fill every free march with a gather order | Multiple squads should not sit idle |
| 5 | Start a building, research, or train timer too | Progress continues while you are away |
Resource buildings: useful, not your main income
Base buildings do produce resources, but not nearly as much as gathering. A practical cutoff many players use: do not upgrade resource buildings past level 20. Past that the return gets weak. Put those resources into Base milestones, troop camps, and research that actually change your power — plan the costs with the Building Upgrade Calculator.
Common pitfall: upgrading every farm and oil well while your Base and camps lag. Gathering covers income; Base level gates events and troop tiers.
Tip 3: Recruit heroes and survivors early
A lot of new players hold recruitment tickets for a future event so they can score points from pulls. The logic is understandable. For week one, the stronger play is the opposite: recruit as many heroes as you can in the early days.
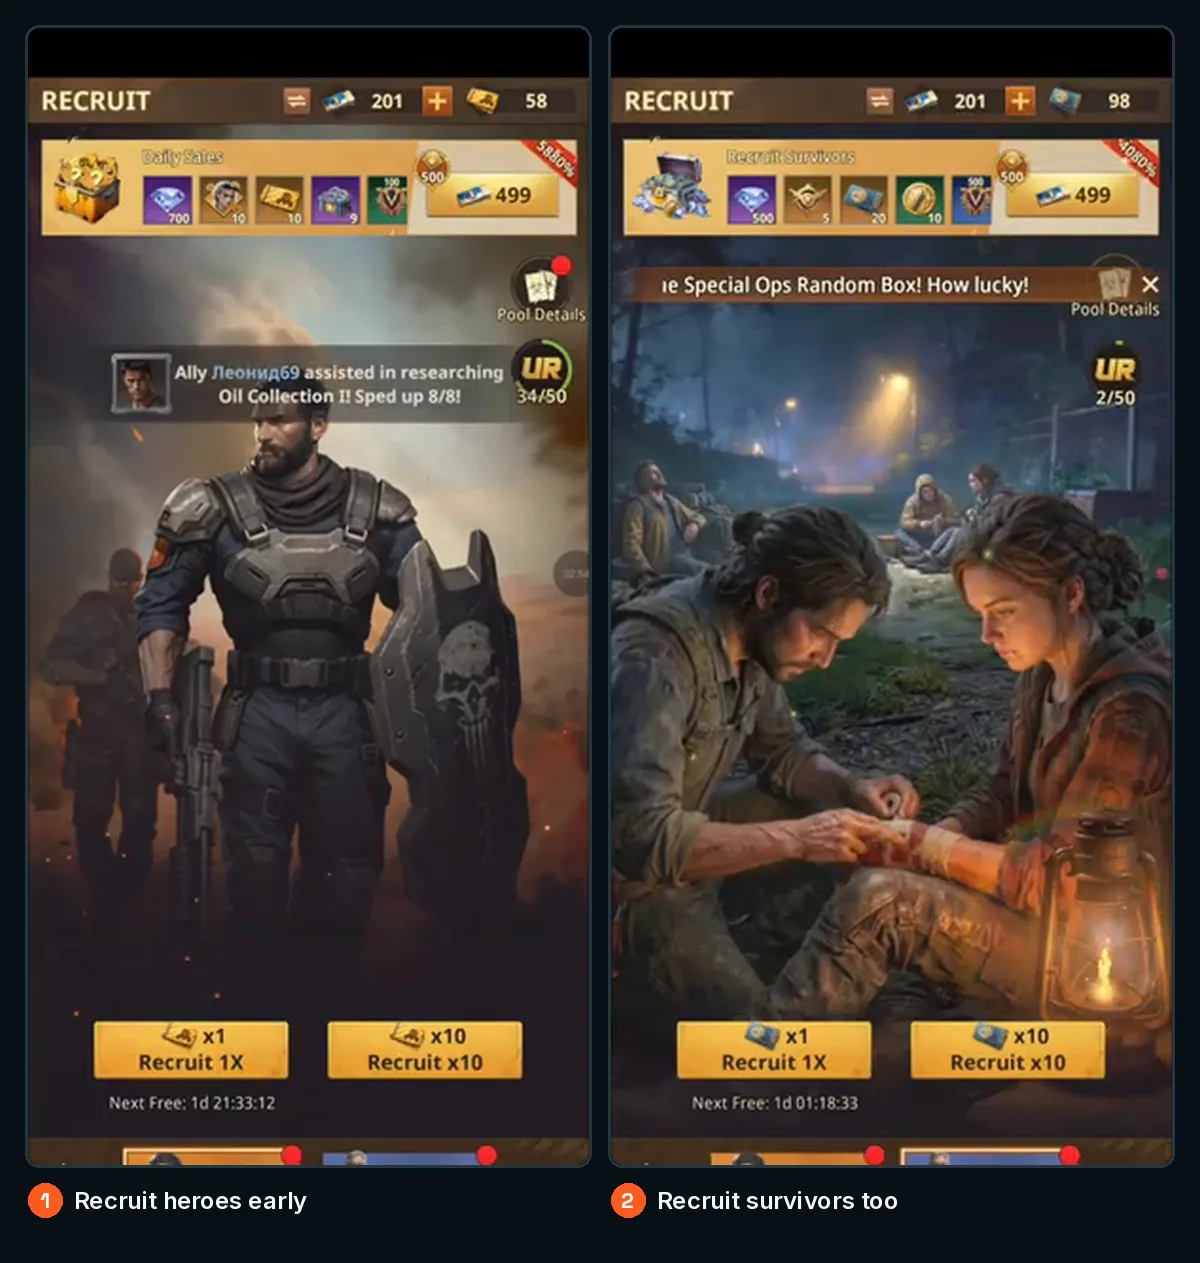
Why recruiting early beats waiting
- A stronger roster makes you stronger than the average non-spender next to you.
- If others hold tickets and you do not, you can beat them and take resources.
- You start learning skills and roles sooner — use the Hero Calculator and hero guides before heavy investment.
Hero and survivor priorities
| Recruit | What it does for week one | Priority |
|---|---|---|
| Heroes | March power, skills, PvE clears | High — pull early |
| Survivors | Jobs such as reducing building time and research time | High — keep recruiting both |
Common pitfall: sitting on tickets all week for an event that has not opened yet, while your marches stay weak. You can still join later events; you cannot redo week-one fights with a thin roster.
Tip 4: Hold Omni Hero Shards for the right hero
Omni (universal) shards can upgrade any orange hero. That makes them feel free to spend. They are not. If you are building toward the Tactical faction, hold Omni shards until the Tactical heroes you want arrive — then spend immediately.
| Choice | What happens | Verdict |
|---|---|---|
| Spend Omni shards on the orange heroes you have now | Short-term power; shards gone when the right Tactical hero lands | Avoid in week one if you are waiting on Tactical |
| Hold Omni shards for the right Tactical hero | One “purchase” you only make once, spent on the hero you actually want | Recommended |
Treat Omni shards as a one-time purchase. Spend them on the wrong hero and you cannot take them back. Compare kits on the hero guides before you commit.
Tip 5: Don’t level troop camps equally
Troops are the same kind across camps, so you do not need every camp at the same level. Spreading upgrades evenly slows your path to higher-tier troops. A clear example of the focused approach: one camp at level 11 while another sits at level 4.
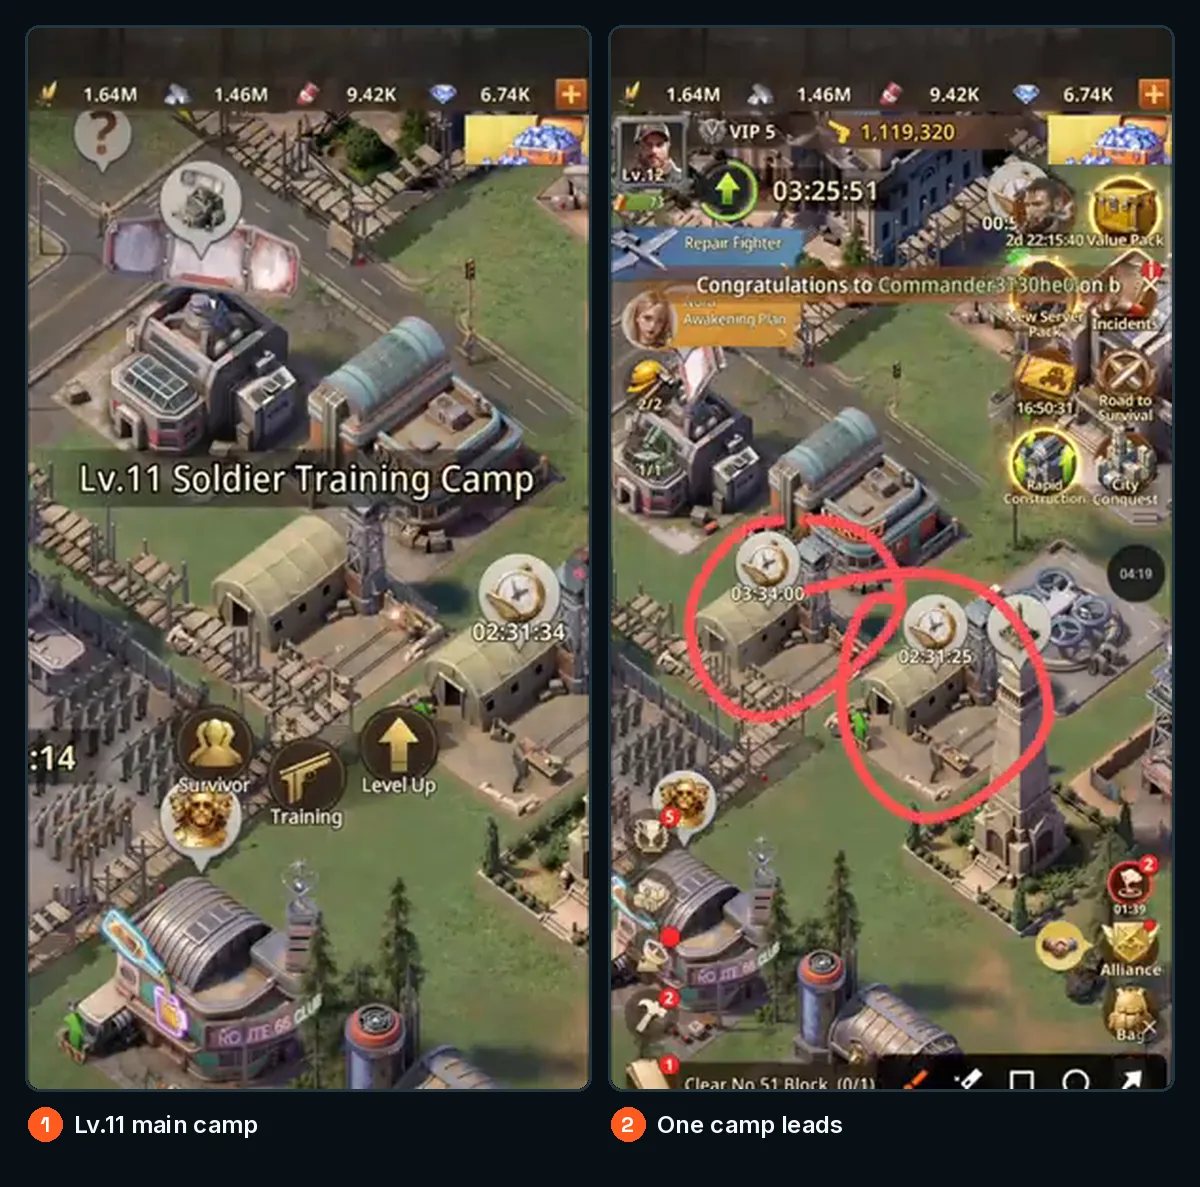
Troop camp plan by Base level
| Focus | What to do |
|---|---|
| Base progress | Keep pushing your Base to level 20 at least |
| Until T7 unlocks | Let one camp lead; leave the other lower |
| After T7 unlocks | Bring the other camp up to match |
| While camps upgrade | Train lower-level troops in one camp and upgrade troops to a higher level in the other so both stay busy even when the drill ground is full |
Common pitfall: upgrading three camps one level at a time. You burn the same resources and unlock strong troops later. One lead camp gets you to T7 sooner; then you mirror.
Tip 6: Make a farm account
A farm account is a second account on the same server that gathers and supports your main. Use it for gathering and low-risk tasks so the main account can fight and clear events.
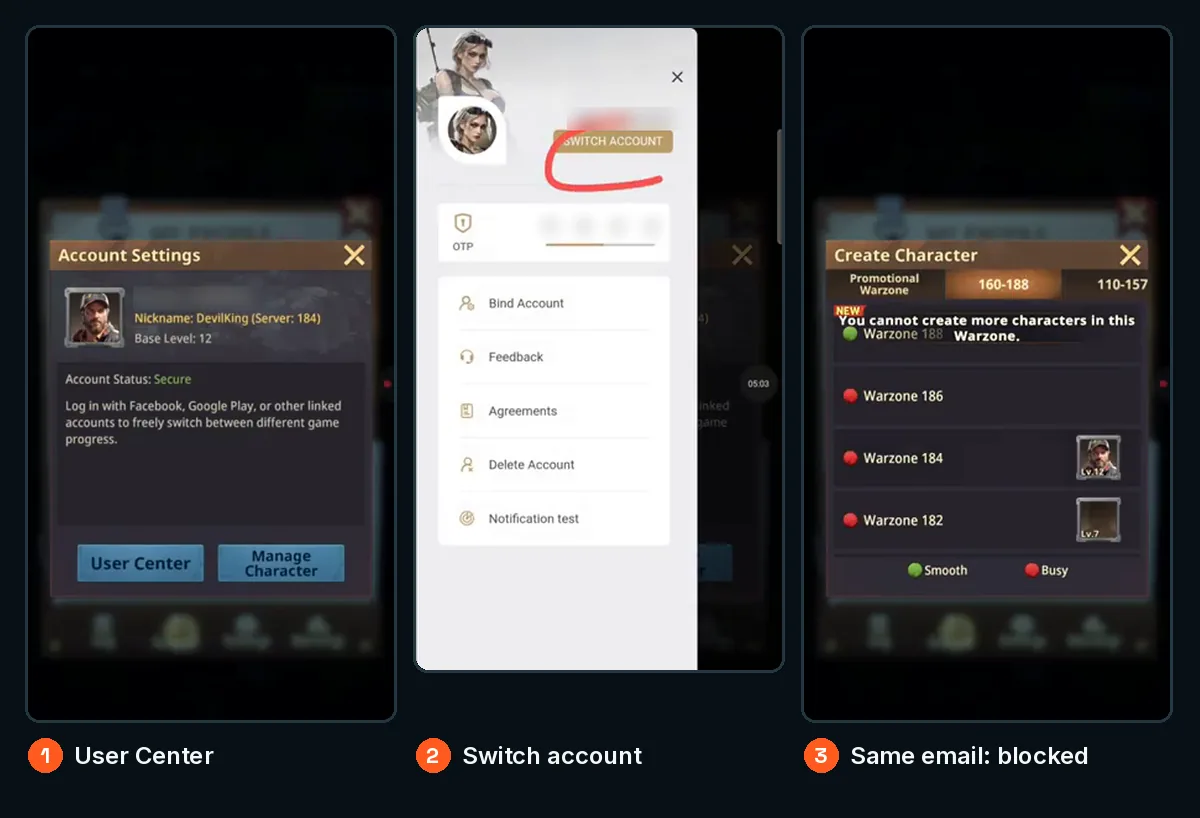
Farm account setup steps
| Step | Action | Note |
|---|---|---|
| 1 | Open User Center | From Account Settings on your main |
| 2 | Tap Switch Account | Do not reuse the same login if you need a new character on this war zone |
| 3 | Start with a new email | Same email: the game says you cannot create more characters in this war zone |
| 4 | Join the same server as your main | Farm support only works if you share the war zone |
| 5 | Read the game rules first | Only build a second account if it is allowed for you |
This tip is not permission to break the rules. Confirm a second account is allowed before you invest time in it. If the rules on your platform forbid it, skip the farm entirely and put that time into gathering research and beginner events on the main account instead.
Tip 7: Do every beginner event
Beginner events are some of the easiest free progress in the game. Participate in all of them while they are up.
Beginner events to clear
| Event | What this site has | Notes |
|---|---|---|
| Power Awakening | Event guide | Do it while it runs |
| Mission Readiness | Event guide | Do it while it runs |
| Pioneer Chests | In-game panel | Check live rewards in-game |
| Desperate Survival | In-game panel | Clear while available |
| Survival Trials | In-game panel | Clear while available |
| Alliance Ambush | In-game panel | Clear while available |
| Giant Invader | In-game panel | Clear while available |
| Road to Survival | Event guide | 7-day starter; opens Base Lv.4; unlocks Nora |
| City Conquest | In-game panel / timeline | See also the Monument timeline |
Road to Survival
Road to Survival is a 7-day starter event. It opens at Base level 4. Finishing it unlocks Nora. Score chests use your total points across the whole event at 50, 100, 190, 380, and 650. You do not need to finish everything on day one — keep steady progress and claim what you earn. More detail: Road to Survival guide and the First 24 Hours Guide.
| Road to Survival | Detail |
|---|---|
| Length | 7 days |
| Opens at | Base level 4 |
| Unlocks | Nora |
| Chest points (total) | 50 / 100 / 190 / 380 / 650 |
Those events are free rewards. Do not leave them on the table.
What to do tonight
If you only have one session left today, run this short list:
- Open any zombie you were about to attack and read recommended power. Skip it if you are clearly under.
- Send every free march to the highest gather node you can before you log off.
- Spend idle recruitment tickets on heroes and survivors (not Omni shards).
- Confirm Omni shards are still sitting in the bag for your Tactical target.
- Check which troop camp is the lead camp; put the next upgrade there, not on the weak one.
- Open the event list and claim or finish anything under beginner / Road to Survival / City Conquest.
- Start one long timer (Base, research, or training) so it runs overnight.
- Grab any new gift codes and tick the Daily Checklist.
Recap: first-week checklist
- Only fight zombies you can beat; lost fights kill troops and keep the stamina.
- Gather every logout; highest node; gathering research; resource buildings soft-cap around 20.
- Recruit heroes and survivors early instead of hoarding every ticket.
- Hold Omni Hero Shards for the right Tactical hero.
- One troop camp leads to T7; Base toward 20; train in one camp while upgrading the other.
- Consider a same-server farm via Switch Account + new email — only if the rules allow it.
- Clear every beginner event; Road to Survival unlocks Nora and pays chests at 50–650 total points.
Frequently asked questions
Should I attack zombies above my recommended power?
No. Check recommended power first. For example, 538k against a 600k recommendation already looks risky, and a level 15 fight can end with 90 dead and 46 in hospital.
Do I get stamina back if I lose?
No. Lost fights do not refund stamina. That is why overreaching is a double loss.
Are zombie hordes worth it?
Yes when you can win — they give mixed rewards including speedups and blue gear chests. Skip them when the power check fails.
Should I upgrade resource buildings past level 20?
Usually not. Gathering from high nodes plus gathering research outpaces late resource-building upgrades.
Should I save recruitment tickets for an event?
For week one, recruit early. A stronger roster now beats waiting for points you might score later.
Why recruit survivors too?
Survivors have jobs such as cutting building time and research time. Keep recruiting both heroes and survivors.
Who should get Omni Hero Shards?
Hold them for the right hero. If you are aiming at the Tactical faction, wait for those heroes rather than spending on the first orange hero you own.
Can Omni shards upgrade any hero?
They can upgrade any orange hero. That flexibility is why spending them early is so costly.
Should every troop camp be the same level?
No. A focused example is level 11 on the lead camp and level 4 on another. Push Base toward 20, unlock T7 on the lead camp, then match the others. Train in one camp while you upgrade the other.
How do I start a farm account?
User Center → Switch Account → new email → same server as your main. Same email is blocked from creating more characters in that war zone. Check the game rules first.
When does Road to Survival open, and what does it give?
At Base level 4. It runs 7 days, unlocks Nora, and has score chests at 50, 100, 190, 380, and 650 total points.
Which beginner events should I not skip?
Power Awakening, Mission Readiness, Pioneer Chests, Desperate Survival, Survival Trials, Alliance Ambush, Giant Invader, Road to Survival, City Conquest — and any other beginner event still on your panel.
Where do I track daily tasks and codes?
Use the Daily Checklist and the Gift Codes page.
Comments
No comments yet. Be the first.